Posted in Christmas, Christmas Cards, Dry Embossing, Festival of Trees, Punches

Paperbelles Christmas Party – Secret Santa card


Hi Friends

Well as I mentioned yesterday I attended this years Paperbelles Christmas party about a week and a half ago.

We were all asked to make a card to give with our secret santa present.

This is what I created.

Paperbelles Xmas Party Secret Santa card

I used Cherry Cobbler card stock for my base card and Very Vanilla for the mat.  I punched out the stars across the top of the Very Vanilla with the new Stars punch, then adhered some of the Champagne Glitter card stock behind.

The greeting is from the Wonderous Wreath stamp set and the trees are from the Festival of Trees stamp set.  The only difference between this card and the one I gave away is that the greeting and trees on this card have been embossed with Cherry Cobbler embossing powder, where as with the card I gave away I just stamped the greeting and trees with Cherry Cobbler ink pad.  Two of the trees are popped up with dimensionals ans the trees with the baubles on them have gold ink stamped over the top for the baubles.

Paperbelles Xmas Party Secret Santa card inside

As always I decorated the inside if the card too.  This is a fabulous habit I got my from my friend Vicki Burdick who always decorates the inside of her cards to beautifully.  Again the greeting and trees have been embossed with Cherry Cobbler embossing powder.  Some of the trees were also punched out using the new Tree Punch.

I also made a little gift to give to everyone who attended the Christmas party, come back tomorrow to see what I made.

Thanks for visiting.

Tina xo

Posted in 3D Items, 3D Project, Big Shot, Christmas, Christmas Cards, Gift Tags, Punches

Paperbelles Christmas Party


Hi Friends

Well I thought I was done with my crafting for 2014, but as they say never say never…:)

Just over a week ago I attended the Paperbelles Christmas Party and had a fantastic time.

I got to catch up with lots of lovely ladies I haven’t seen in ages and meet a few new faces too.

Along with the fabulous food that was on offer for the day we also got to make three gorgeous make n takes.

This is the first one I made.

Paperbelles Xmas Party Make n Take

Isn’t this a lovely card, I would never have thought to use the snowflake die as leaves for a flower.  We did have the option of adding a Christmas greeting, but I felt mine was perfect just as it is and didn’t want to over-crowd it by adding a greeting.  The card and flower is made with Cherry Cobbler card stock the leaves are Old Olive card stock a vintage brad was used for the middle of the flower and twine was also used.  Finally we used some Basic Pearls and Frosted Embellishments to finish it off.

I found the second project a little challenging but I think it turned out ok, what do you think?

Paperbelles Xmas Party Make n Take 1

This gorgeous rose is a wine bottle tag, but I think you could hang it on your Christmas tree as a decoration if you like.  The rose is also made with Cherry Cobbler card stock and co-ordinating ribbon.

Paperbelles Xmas Party Make n Take 2

The third make n take that I made is the amzing Christmas decoration.  It is a little tricky to get it together but once you have it, it looks really striking.  I really love this.

As part of the Christmas party we were asked to bring a secret santa present to the value of $10 and make a card for our secret santa recipient, come back tomorrow to see my secret santa card.  I will also be posting the card that I received from my secret santa.

Thanks for visiting.

Tina xo

Posted in 3D Items, 3D Project, Big Shot, Christmas, Christmas Cards, Gift Packaging, Good Greetings, Kids Classes, Punch Cards, Punches

Final kids class for 2014


Hi Friends

Well the time has come and I have just held my last kids class for 2014.  It was a happy and a sad class as it will be over a month before I see the girls again.  I am going overseas in January and won’t be recommencing my classes until February 2015.

In the previous class Elise asked if we could make a Santa box.  A Santa box I thought, how do we do that?  So I got onto Pinterest and started doing some research.  I realize the Big Shot die I used to make this Santa box is now retired but it was the perfect tool for this project.

Dec Kids Class - Santa Pillow Box


The box is made using the now retired Pillow Box Bigz Die.  It is just the right size to fit a Freddo size Christmas chocolate in.  Santa is made with a various range of Stampin’ Up! punches some retired, but most of them them can still be found in the current catalogue.  Isn’t he just the cutest?

We even made a co-ordinating 3×3 card.

Dec Kids Class - Santa 3x3 card

The card and box is made with Real Red card stock and we made the same Santa as we did for our little box.  Santa’s face is made using Pink Pirouette card stock and his beard, moustache and hat trim is Whisper White card stock, his eyes are Basic Black card stock.

The greeting stamped in Black StazOn is from the Good Greetings stamp set and popped up with dimensionals.

I had all four girls at this final class which was just a perfect way to end our year.  It was lovely to see them all together one last time for 2014.

They all had such a ball making our Santa box and matching card.

I would love to hear your comments.

I don’t think I will be doing too much more crafting between now and the time I get back from our holiday, so I would like to thank you all for following my blog and coming back regulary to see what I have been up to.

I wish you and your family a very happy, safe Christmas and look forward to sharing more fun projects with you next year.

Thanks for visiting.

Tina xo

Posted in 3D Items, 3D Project, Big Shot, Christmas, Framelits, Good Greetings, Kids Classes

December’s first kids class


Hi Friends

Well the end of the year is not too far away now and I am winding up my fortnight kids class.  I am fortunate enough to be holding them again next year.

I have really enjoyed my time with my little crafters and I know they have loved making something new every second weekend.

They really love to make boxes and 3d items rather than cards, which has been a bit of a challenge during the year but I think I have done ok finding projects that aren’t too complicated for them.

This is what we made in our second last class of the year.

I thought it might be a good idea to make some Christmas decorations to hang on their Christmas tree.

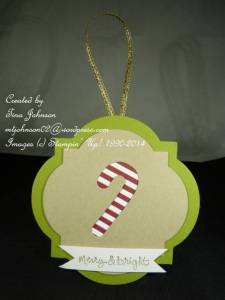
Dec Kids Class - Candy Cane ornament

We cut the ornament from framelits in two different sizes using Old Olive and Crumb Cake card stock.  Then we cut out the little candy cand with another framelit and stuck some Christmas themed DSP behind it.

The greeting is from Good Greetings and was stamped on Whisper White card stock with Gold Ink, then we just snipped banner ends and attached it to the ornament with dimensionals.  Gold ribbon was attached to the ornament so it can hang from the tree.

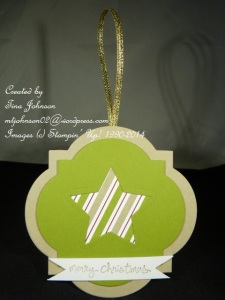
Dec Kids Class - Star ornament

The second ornament was made the same way but we cut out a star with framelits instead.

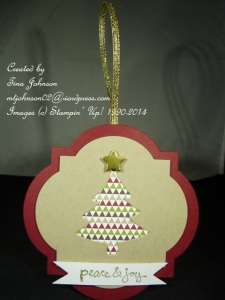
Dec Kids Class - Xmas Tree ornament

The third of the ornaments we used Cherry Cobbler and Crumb Cake card stock and die cut out a Christmas Tree with Framelits and a little gold star for the top.

These ornaments are so quick and easy to make and the girls had a ball making them.  By the time we were onto our third one they were little experts in what to do.

I was pleasantly surprised to find out in our next class that these ornaments were attached as gift tags to some “Cake in a jar” gifts that the girls gave to their teachers at school.  Their mum typed out the cake recipe and stuck it to the back of the ornament.  Such a clever idea.

It was lovely to hear they actually used these and passed them onto someone else rather than just hanging them from their tree.  It’s always nice to have your projects shared with others.

Thanks for visiting.

Tina xo

Posted in 3D Items, 3D Project, Christmas, Gift Tags, Party Time, Punches, Shaker Gift Tags, Stampin' Up! Events, Star Album, Trio of Trees

Ooops I forgot…


Hi Friends

I got so carried away with showing you all the fabulous make & takes that I made at the Stampin’ Up! Party Time back on November 1, I totally forgot to show you what I made to have on display in the Product Playground.

As you may remember Christmas was the theme of the entire event so of course my projects are perfect for Christmas.

I am a real tradititionlist when it comes to Christmas I decorate my house in traditional red, gold and green and usually make my cards and gift tags with the same colour theme.  I know this might sound boring but I just can’t seem to get my head around any other colour combination being suitable for Christmas, especially as here in Cairns it is always sweltering weather during the Christmas period.

This time I decided to stretch myself and use non-traditional colours for my projects.  This is a matching set including a star album and shaker gift card.

Party time - Shaker gift tag

I used one of the new Stampin’ Up! in colours for the card stock and ribbon.  This is the new Lost Lagoon colour and it is just beautiful.  The Christmas tree is punched out using the new Tree Punch and the little stars inside the shaker gift tag are from the Many Stars Punch.  This is the first shaker gift tag I have ever made and I am really happy with how it turned out.  I also used a little bit of Silver Glimmer Paper for the star at the top of the tree.

Party time - Star album frontAgain, I used Lost Lagoon card stock and Soft Sky card stock for this star album.  The Christmas trees are from the Trio of Trees stamp set, were stamped in Lost Lagoon and Soft Sky ink and punch out with the Tree Punch.  I also used Silver Glimmer card stock of the little star.  Lost Lagoon ribbon was used to tie the album closed.

The special thing about this album is how it looks when it is open.  Do you want to see?

Party time - Star album

Cool hey?  It really looks like a star don’t you think?

Party time - Star album close up

Here is a close up of the inside.  I used the 2″ Circle punch to punch out the circles and stamped and punched out the Trio of Trees Christmas trees to stick inside them.  You can always leave one side blank and add a photo if you want to turn it into a mini album.

What a great Christmas present for a grandparent, or relatvie.

Thanks for visiting.

Tina xo
 

Posted in 3D Items, 3D Project, An Open Heart, Big Shot, Blendabilities, Candles, Christmas, Framelits, Gift Tags, Letterpress Winter, Make & Takes, Multiple Stamp Sets, Off the Page, Photopolymer Stamp Sets, Punches, Retreat

Shanni’s Stampin’ Cornicopia part 3


Hi Friends

I have some more of the make & takes I made at our annual retreat this year.

As you have probably been able to tell the make & takes have had a Christmas theme, which is appropriate for this time of year, as we are all starting to think about home-made Christmas card, decorations and gifts.

Stampin’ Up! has an amazing range of products that can assist you in creating original, one-off gorgeous Christmas cards, decorations, gifts and gift-wrapping.  So if your looking for top quality, well priced, co-ordinating products to make your Christmas projects than contact me today or pop on over to my Stampin’ Up! shop by clicking on the shopping trolley and purchase your’s today.

Ok, want to see what else I made?

Xmas gift cards - red - Shanneans 1 day retreat

First off, we start with these sweet, simple and quick gift tags.  The Scalloped Tag Topper Punch and the new photopolymer Letterpress Winter stamp set for the snow flakes, which were stamped with Whisper White ink.  A snip of Real Red Satin Ribbon was used to complete these versatile gift tags.

Xmas gift cards - white - Shanneans 1 day retreat

I also made some white gift tags, however this time we used Real Red ink and Silver ink for the snowflakes with a touch of Silver Satin Ribbon.

Xmas gift tag - Shanneans 1 day retreat

Another gorgeous gift tag that actually matches with the card I showed you a couple of days ago using the An Open Heart stamp set and the Square Tag Topper Punch.

Xmas gift tag 1 - Shanneans 1 day retreat


The last of the gift tags also uses the An Open Heart stamp set and is part of the matching set with the above gift tag and the card posted previously.  It is made using the Banners Framelits.

Xmas candle - Shanneans 1 day retreat


Finally, I decorated a Christmas candle.  Using the An Open Heart stamp set to complete the set of matching projects this candle is so incredibly simple but so effective.  I have made similiar candles to this a few years back as gifts for my co-workers and really enjoy making them.  If you would like to learn how to make these candles or any of the projects shown here today then contact me to arrange a Stampin’ Up! demonstration, with 2-3 of your girlfriends.

I would love to hear you comments about my projects.

Thanks for visiting.

Tina xo
Posted in Big Shot, Bloom with Hope, Framelits, Good Greetings, Punches, Retreat, Retreat Challenges

Shanni’s Stampin’ Cornicopia part 2


Hi Friends

Well I’m back to show you more of what I made at our 1-day retreat this year.

Did you see the three make & takes I posted a couple of days ago?  Which one was your favourite?  I would love to hear your comments.

As well as having make & takes to create, we also had challenges to participate in, although there were several of these during the day, I didn’t participate in all of the as I had some specific projects I really wanted to complete during the day.

This is the card I created for one of the challenges.

Group Challenge - Shanneans 1 day retreatWe were given 1 hour to create a card using the products in our bag plus we had to have at least 1 stamped image and a greeting.  These colours are some of the new In Color card stock.  I used Hello Honey and Lost Lagoon card stock along with the new Typeset designer series paper.  The stamp set I used is one of the current hostess stamp sets called Bloom with Hope.  I love this stamp set so much.

The ovals were cut using the Oval Framletis and my favourite card making tool my BIG SHOT!!!  I stamped the image with Black StazOn ink and added some white Bakers Twine.  Obviously all products are from Stampin; Up! and can be purchased at my SU shop by clicking on the shopping trolley to the left hand side of my blog.

The greeting is from the Good Greetings stamp set which I received for FREE during a recent SU promotion and has been punched out with the Decorative Label punch.  If you want to learn how to earn fabulous stamp sets and more for FREE by either becoming a Stampin’ Up! demonstrator or by becoming a customer then contact me today.

Thanks for visiting.

Tina xo

Posted in An Open Heart, Big Shot, Blendabilities, Christmas, Christmas Cards, Dry Embossing, Framelits, Good Greetings, Multiple Stamp Sets, Ornamental Pine, Retreat

Shanni’s Stampin’ Cornicopia


Hi Friends

Well if you know me or have been following my blog for over a year or so you may have noticed a particular posts missing this year.

Normally once a year, during September, I attend a three day stampin’ retreat that my friend Shannean holds.  Unfortunately, this year due to lots of circumstances beyond her control she was unable to hold our annual retreat to the Tablelands for 3 days.

However, never one to disappoint her team and customers, she thought outside the box and came up with an alternative option for us this year.

Announcing…….Shanni’s 1-Day Stampin’ Cornicopia!!!!

Although I had a fantastic time and made lots of gorgeous projects, one day just didn’t feel like enough.  I’m not being ungrateful I truely appreciate all the time and effort Shannean put into this 1-day event for us, but I really did miss my 3 days away up on the Tablelands.

Fingers crossed we will be back to a fun filled 3 day retreat next year.

During the day we had 3 make & takes to create, these are mine.

Make & Take 1 - Shanneans 1 day retreat

Isn’t this a gorgeous card?  I haven’t used the Tab Framelits before but they really add a extra something to this card.  The stamp set used to make this card is called An Open Heart and it is just so versatile.

Make & Take 2 - Shanneans 1 day retreat

Our second make & take is a simple, embossed Christmas card.  The pine branch was embossed with silver embossing powder and really looks striking in real life.  Ornamental Pine is the stamp set used in both the second and third cards.


Make & Take 3 - Shanneans 1 day retreatThe third make & take is also a Christmas card and was embossed too.  We embossed the pine branch and pine cone with white embossing powder and then coloured it in with the new Blendabilities alcohol markers from Stampin’ Up!.  I am wrapt with how well this card turned out it really does look so effect and its incredibly easy to do.

All the products used to create these cards can be purchased over at my Stampin’ Up! shop, just click on the shopping trolley on the left hand side and get yours today.  Most of these products are available through the Occasions mini catalogue and will only be available until the end of January so don’t wait too long or you may just miss out.

Remember to pop back again to see more of what I made at Shanni’s Stampin’ Cornicopia 1-Day Retreat.

Thanks for visiting.

Tina xo


Posted in Ornamental Pine

Paperbelle’s Social Night


Hi Friends

I have a confession to make….

I am part of an amazing Stampin’ Up! team, not just my immediate team, The Hooters, but also my extended team, The Paperbelles.

Unfortuntately, I haven’t been a great team member for The Paperbelles this year.  Although I have made an effort to attend as many classes and events as I possibly could that my gorgeous upline Michelle Zahra, leader of The Hooters has held this year I haven’t been quite so generous with my time and efforts with The Paperbelle events.

This is something I am going to try and correct in 2015.  If it wasn’t for The Paperbelles leader Shannean Moncrieff I may never have discovered Stampin’ Up! or even joined Michelle’s fantastic team.  So I really do owe her alot, although I know she would strongly argue this point. 🙂

Well as part of my efforts to try an attend more of The Paperbelles events I got off my backside and attended the final Paperbelles social get together night in November.

Although it was a small group, as some of the girls had other commitments it was a lovely night and I got to make two cards.  One I have already shown you, that was Nerida’s birthday card, and the second one is this…

Paperbelles social night xmas card

Isn’this a gorgeous Christmas card?  I haven’t purchased this stamp set out of the Holiday Mini Catalogue but I think I am going to have to.  I have been seeing so many fabulous cards on Pinterest using Ornamental Pine, that is definitely going to be worth purchasing it.

If you want one of your own pop on over to my Stampin’ Up! shop by clicking on the shopping trolley to the left hand side and get one today.  The Holiday Mini cattie is only available until the end of January, which is fast approaching.

Please leave me a comment if you feel the need, I love to hear your thoughts.

Thanks for visiting.

Tina xo