Posted in Uncategorized

World of Good Suite


Why is it that masculine cards always seem so difficult? Thank goodness Stampin’ Up! have some fabulous masculine products in the current catalogue, just like the World of Good Suite of products currently available in the Stampin’ Up! catalogue.

Being an avid crafter I love to make cards for as many people in my life as possible and sometimes that includes people I don’t know especially well, like co-workers. If someone in my life is celebrating a birthday, baby or even greiving from a loss I just want to celebrate or support them in my own little way with a card.

That’s how this card came to exist. One of the men in our work team was celebrating his birthday and I couldn’t resist sending him a card.

Although it’s simple in design there is quite a few layers to this one. I love the World of Good designer series paper it makes creating a background so simple. The co-oridinating dies make creating the globe and stand so quick.

Although there isn’t alot of stamping in on this card, mainly the compass background image and the greeting I still think it’s a card with impact.

I hope I have inspired you to create something for the men in your life this week. If you are interested in purchasing the World of Good products please reach out to me I would love to help you.

Thanks for popping in.

Tina

Posted in Uncategorized

If you had to choose?


If you had to choose just one favourtie product from the current Stampin’ Up! catalogue what would it be? I know for me it would undoubtably be the Forever Greenery Suite. Every item in this suite just sings to my heart and I can’t get enough of any of it. I guess it’s probably because it just makes my cards so easy to make with all the layers I love to add. The designer series paper Forever Greenery is just gorgeous (I think I own several packets of it), and the embellishments that co-ordinate with this suite are beautiful. Who doesn’t love a touch of gold here and there?

I made both of these card for World Card Making Day back in September with some friends when we all attended a virtual event.

The great thing about this suite is that you can make a really simple card like the one above or you can go all out like this fun-fold with lots of layers and emblishments like the one below. I think the blues and greens in this suite are gorgeous and co-ordinate so well.

I am so in love with this card and all the layers, this is so my style. I was planning on keeping this card and never sending it, you know those one’s you make that just turn out so good you can’t bear to part with them? Well, that was my plan but I ended up sending it to one of my sister-in-laws for her birthday. I’m glad I did send it in the end because she absolutely loved it…..And isn’t that the real reason why we make beautiful cards, to give other joy?

I also made another card with this amazing suite, there are still lots of layers and of course the required touch of gold, don’t you just love the gold fern leaf in the background?

I hope I have inspired you to create something beautiful today, if you are interested in purchasing the Forever Greenery Suite or would like to attend any of my classes please make contact with me, I would love to help you out and share my love of Stampin’ Up! and card making with you.

Thanks for popping by.

Tina

Posted in Uncategorized

Who loves chocolate?


All good things in moderation, isn’t that what they say? Well not anymore with The Nothings Better Than stamp set from Stampin’ Up!. I love this set.

If your a chocolate, cocktail, coffee or cookies lover keep reading, this set has something for all of you.

I go to Pinterest to get a lot of my inspiration, I mean who doesn’t? It’s the “go to” for crafters of all types, so when I saw this card from Elizabeth Price I fell in love and knew I just had to CASE it. I love how soft and girly the card looks.

This stamp set can be used in so many ways. I like the soft look of the card above but it can also be bright and vibrant like the one below that I made at a friends card class…..Cocktails Anyone?

Or you can go subtle and tempt the coffee lover in your life with this sweet, simple, quick card.

Or if your feeling really inspired how about tempting the chocolate lover in your life with this cute fun-fold card?

I hope you have found lots of inspiration from today’s post that has encouraged you to go make a “sweet” card for someone. If you are interested in pruchasing this stamp set or any of the products to make these or your own cards, please reach out to me and I would be happy to help.

Thanks for popping in.

Tina

Posted in Uncategorized

Jar of Flowers


Hi!, welcome to my blog. I have another card to show you today. This is one I cased from Pinterest and mixed it up a little just to make it a bit different. I made this card for a friend of mine who left Australia to follow her heart and live in Canada with the man of her dreams. She is loving it over there and they were married last year. I miss our daily chats but try to catch up with her as often as we can virtually.

This card is made from the Jar of Flowers stamp set. I love how versatile this set is and how just by changing up the colours of the flowers you can create so many pretty cards. I love layering my cards in one way or another and probably use way too many dimensionals but hey, it’s my thing and I’m sticking with it 🙂

The lighting isn’t great on this card, and so I have finally got around to setting up my light box (now I just have to work out how to keep the cats out of it)

I made two very similiar versions of this card, because I am just so in love with the gold hoop accessories. The leaves in the background have been die cut from glassine sheets which I just love. They are very similiar to vellum but have a glossy appearance. The flowers and leaves were watercoloured with ink and water painter pens.

The colours are all very Autumn (fall) colours which were perfect for my Canadaian friends birthday (she even messaged me and said my card matched her fall home decoration). Apparently it’s a thing in Canada to decorate your house to the seasons.

I hope you have enjoyed seeing my card today and I look forward to seeing you again.

Thanks for popping by.

Tina

Posted in Pampered Pets, Playful Pets Suite

Pampered Pets


I just love the Playful Pets Suite of products in our current Stampin’ Up! catalogue. It’s so bright and whimiscal and just lots of fun for all ages. I made this fun-fold card for my step-son for his birthday this month. His dog is his best mate and they love hanging out together.

Isn’t this just too cute?

I haven’t done fun-fold cards in such a long time and really enjoyed making this one.

I started with a Early Expresso card base and added layers of the Playful Pets designer series paper and stamped the dog from the Pampered Pets stamp set. I used my Blends to colour both the do and his bowl in with, Real Red and Soft Suede.

I also decorated the inside of the card too, but this time I just fussy cut out one of the dogs from the designer series paper.

I hope you enjoyed my project, thanks for stopping by.

Tina

Posted in Birthday cards, CASEing, Masculine cards, Multiple Stamp Sets, Traveller, World Map

Masculine Traveller


Hi Friends

Well this will be my last post for this week, as I am going away for the weekend so remember to pop back next week to see what I have to show you, or subscribe via email to my blog then you will never miss another post again.

I CASEd this card from Jan Tink, you can find her card here.

One of the very few guys at work has invited us all out to lunch yesterday to help him celebrate his birthday.  I really like Cliffy he has always been very kind and generous to the payroll team and shows his appreciation for all we do.  Which, to be honest, is a really nice change, as most of our customers never show their appreciation for all we do for them week from week.

Anyway, as I have said in the past masculine cards are always a difficult thing, I think I may not be alone in this thinking.  I found this card by Jan Tink on Pinterest and decided it was soooo good I just had to case it.  The only thing that is different between my card and Jan’s is that I think I added a couple of extra mats of Basic Black card stock.

P1050262

The card base and the first mat is Basic Black card stock, I then stamped the now retired World Map background stamp onto Whisper White card stock with Black StazOn ink.  I think wrapped some retired ribbon around this mat.  Again Basic Black and Whisper White card stock were used for the two smaller mats and the boat from another retired (sorry :() stampe set called Traveller was stamped in Basic Black Classic ink.  The technique used to make this image is called the Reflection Technique and although it can be a bit fiddly it really is effective.  All you do is stamp your image onto your card stock, then stamp the image again onto a piece of acetate, turn it over and line up the image on the acetate with the stamped image and press firmly to transfer the ink from the acetate onto the card stock.  Hint** Make sure your inkpad is really well inked up so when doing the reflection image you get a good transfer.  It took me several attempts before I was happy with it.

I then used my Blender Pen to “smudge” the black ink to make it look like water and then used my white Gel Pen to make the wake.  It looks really effective once it’s done and dries a bit.

P1050263

I kept the inside nice and clean so there is lots of room for everyone to write their birthday greeting.  The stamped greeting inside is the Guy Greetings stamp set.

If you would like to learn how to make a card using the Reflection Technique, contact me today and we can arrange an in-house workshop where I can teach you and a 2-3 friends how to do it.  All products that aren’t retired can be purchased from my Stampin’ Up! shop by either clicking on the links within this post or the shopping trolley to the left hand side.

Happy stamping!!

Tina xo

Posted in Easel Cards, Thank-you Cards, You've Got This

You’ve Got This Thank You


Hi Friends

So my up upline Shannean has put out a challenge to the team to create a card using the brand new You’ve Got This #139572  stamp set but with a twist.

If you search for images of this stamp set on Pinterest you will see lots and lots of gorgeous cards but I feel they are all so very similiar.  Some stamp sets are just like that, everyone seems to have the same idea of how to use it, and therefore all the cards you see made with the stamp set seem to be so very similiar to each other.

Well we were having this discussion last weekend and it prompted Shani to put out this challenge to us all.  I always love a challenge and really who wouldn’t miss an oportunity to craft if you get handed one.  So I sat down at my craft table and tried to come up with something different.

I know what type of card I wanted to make, that was the easy part, it was the “twist” that was a bit difficult.  When I first made this card I thought “Yep I have made something with a “twist”, however, the more I look at it I realize it really isn’t that much different to what I have seen on Pinterest.

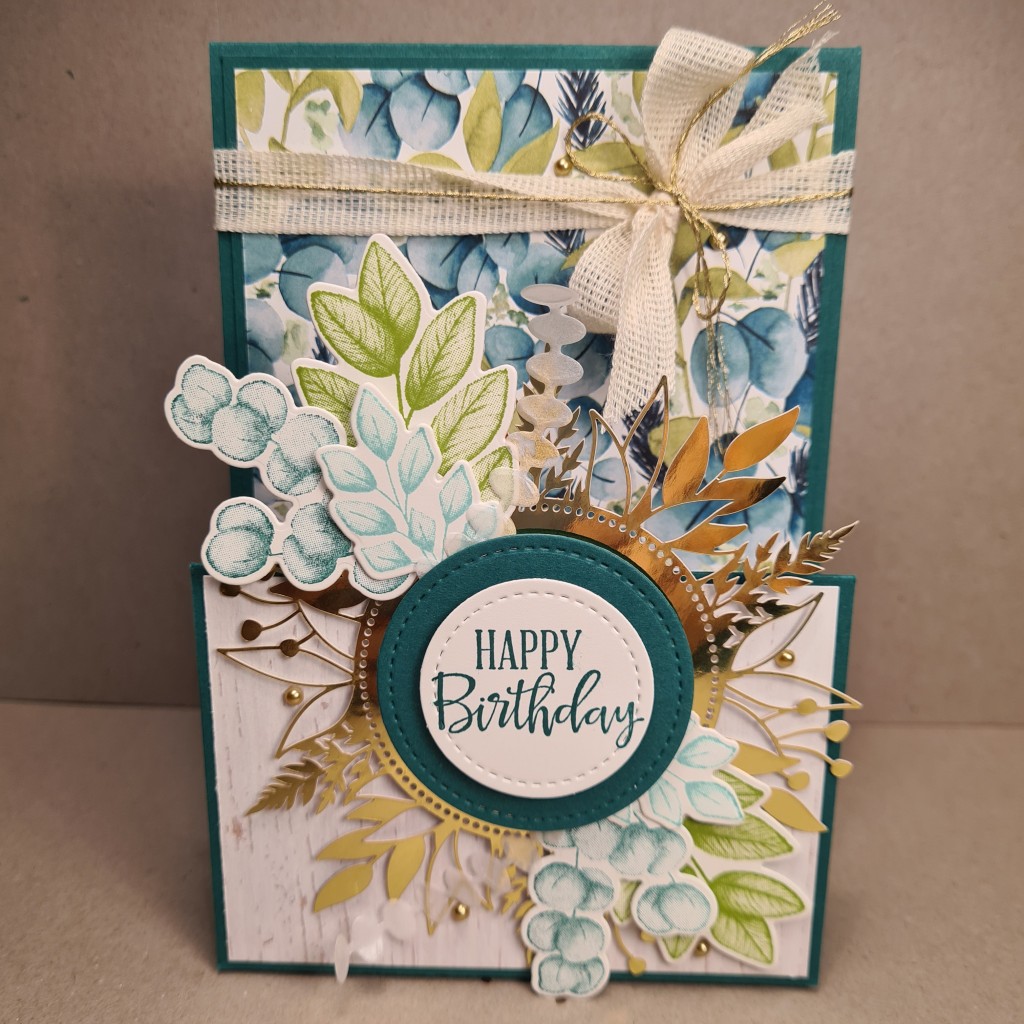
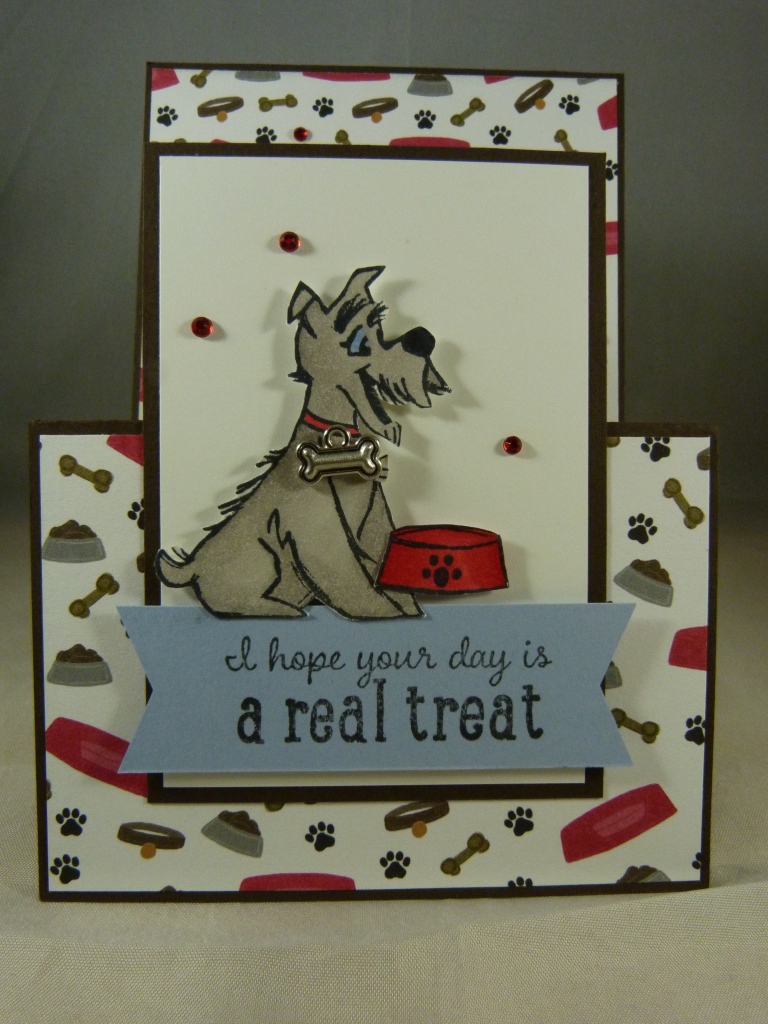
I made an easel card, a style of card I just love, that learnt to make from the fabulous Bronwyn Eastley’s blog.  I was lucky enough to actually meet Bronwyn at last year’s Stampin’ Up! Convention, which was a huge thrill to me.  She is such a lovely lady.

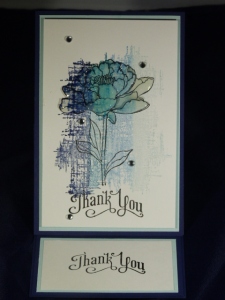
As I needed to make a thank-you card I thought I would combine it with this challenge.  This is what I came up with.

Paula's thank-you card front

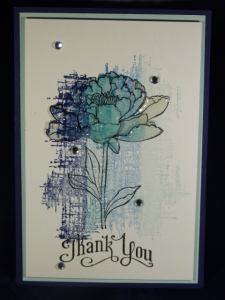
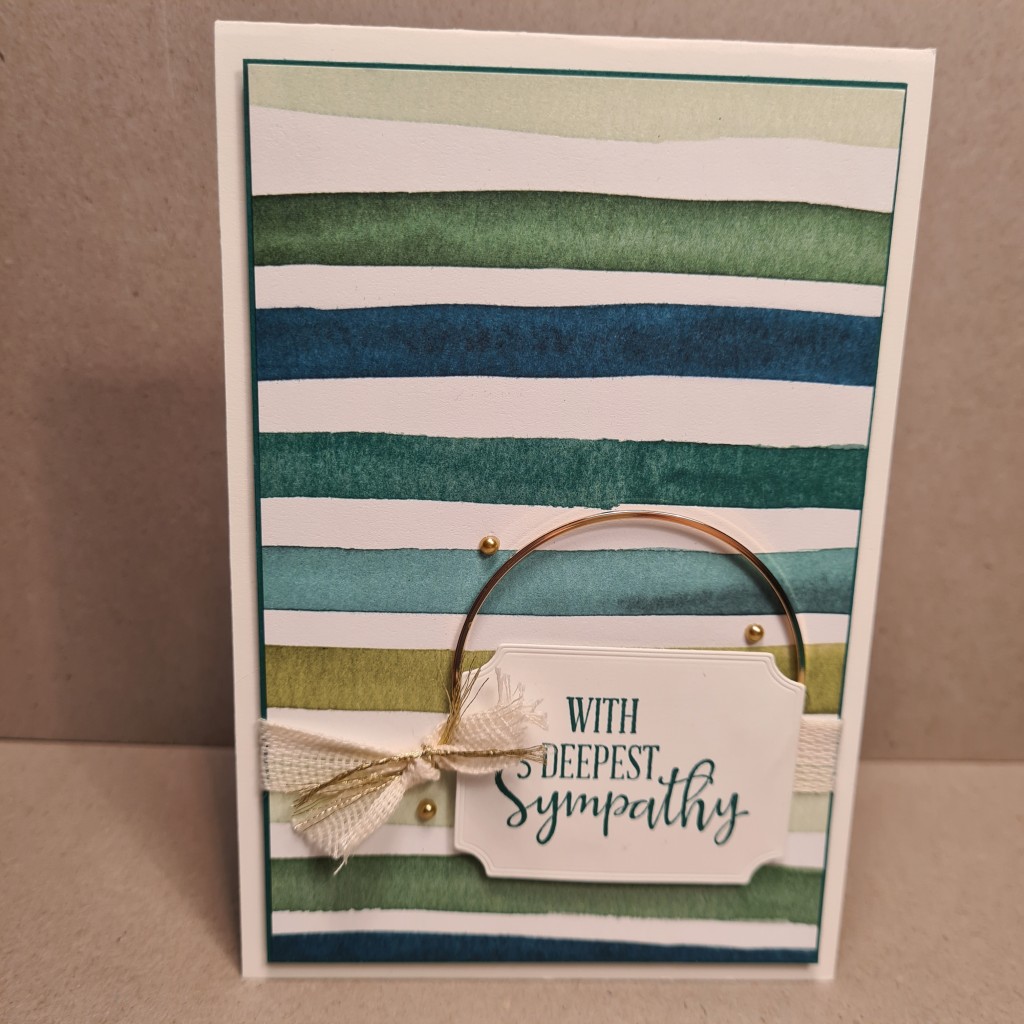
I got the idea of doing the multi-coloured background from a post I saw on Facebook.  Such a cute way to mix it up a bit.  The flower was stamped onto the background stamp in Black StazOn ink and then I cut the flower out a couple of times and added several layers on top of each other for dimension.  Dimensionals are great for doing this and make it so quick and easy.

The colours I used for the background are Night of Navy, Marina Mist, Tempting Turquoise & Soft Sky ink pads.

The card is made with Night of Navy card stock, with a mat of Soft Sky card stock  and Whisper White card stock.

The greeting is from a retired stamp set, but as I have said previously you could always swap it out for a greeting from one of our gorgeous current greeting stamp sets.  As always I added some bling with some Rhinestone Basic Jewels.  The absolute last thing I did was coat the flower with Crystal Effects to make it look shiny and pop.

As I said this is an easel card, do you want to see what it looks like when it’s open?

Paula's thank-you card open

I love how this type of card looks when it’s open.  They are so very easy to make, if you would like to learn how to make an easel card contact me today and I can arrange to come to your house and hold a demonstration with you and a couple of friends and show you how easy they really are.

I love hearing your comments so please leave me your thoughts by clicking on the little red love heart in top right hand corner.

I’m going away this weekend so I won’t get a chance to craft so all going well I will make a couple between now and the weekend.

Happy stamping!!

Tina xo

Posted in Beautiful Birthday, Big Shot, Birthday cards, Butterflies, CASEing, Dry Embossing, Embellishments, Embossing, Embossing Folders, Feminine Birthday cards, Multiple Stamp Sets, Punches, Stippled Blossoms

Stippled Blossoms for Mum


Hi Friends

I hope you are enjoying me getting back to regular posting.  I try to post on a regular basis but as we all know sometimes life can interfer with our best intentions.

Do you like my new method of writing my posts?  I thought it might be more user friendly for you if I not only provide item numbers for the current products that I used to make my cards but also provide links directly to my Stampin’ Up! shop for that particular product, just in case you want to get your own.

I love this card that I made for my mum for her birthday this month.  My mum and our grand-baby celebrate their birthday’s on exactly the same day so it gives me the opportunity to make two very different cards at the same time.

My mum just loves the colour PINK so I always make her a pink themed card.  I also decided to use one of my most favourite stamp sets for this card…the gorgeous but sadly retired Stippled Blossoms.

Again, this is another card that I found on Pinterest and CASED.

Mum's bday card

Whisper White card stock #106549 was again used for both the card base and the mat.  The stamp set is what we call at Stampin’ Up! as a “Two-Step” stamp set.  Which means you have a base solid stamp and a more detailed partial stamp of the image.

The flowers are stamped in Blushing Bride ink #131172 and Rose Red ink #126954 and I stamped the leaves in Pear Pizzazz ink #131180 and Old Olive ink #126953.

I to make the leaves look like they are behind the flowers I firstly stamped both layers of the flowers and then stamped the flower image onto a Post-It Note (remember to stamp your image up the top of the Post-It Note so you have the sticky bit) and stuck it over the stamped flowers, I then stamped the leaves in both colours.  If you have never used Two-Step stamps remember you always stamp the solid stamp first in a light colour then stamp the more detailed stamp in a darker colour of the top.

Of course if you used Stampin’ Up! wood mount stamps you will most definitely need a Stamp-a-ma-jig #101049 it is a must-have for any stamper. Helps you position stamped images exactly where you want, every time. Instructions are included and its perfect for alphabet sets.  It is an invalulable crafting tool that I think is sometimes overlooked.  If you love wood mount stamps like I do then you definitely need one of these!

The butterflies on this card are punched out with two seperate punches, the larger butterfly is punched out with the Elegant Butterfly punch #127526 and the smaller butterfly is the Bitty Butterfly punch #129406.  Both butterflies have been embossed with another retired embossing folder….sorry about that 😦

This gorgeous greeting is unfortunately also retired but was stamped in Old Olive ink too.  If you look really carefully (you can click on the image to make it larger) you will see some Pearl Basic Jewels #119247 in the middle of the butterfly.

Please leave me your comments by clicking on the little red love heart in the top right hand corner of this post, I always love to hear your thoughts.

Happy stamping!

Tina xo


* Sturdy plastic construction
* Nonskid base


Posted in Birthday cards, CASEing, Children, Children's Cards, Dry Embossing, Embossing, Embossing Folders, Kids Birthday cards, Punches, RMHC, Ronald McDonald House Charities, Sprinkles of Life, Tree Builder Punch

Sprinkles of Life


Hi Friends

Have you checked out the new Stampin’ Up! catalogue yet?  If not either click on this link or the photo of the latest catalogue on the left hand side of my page.

I always love it when a new cattie is released it is so exciting to see all the fabulous new products Stampin’ Up! have added.

Every year Stampin’ Up! have one special stamp set which is usually at the very back of the catalogue and it is released specifically to raise funds for the Ronald McDonald House Charities (RMHC). The Ronald McDonald House Charities (RMHC) keeps families together and surrounded by love when their children are receiving medical treatment far from home.  By purchasing this year’s stamp set called Sprinkles of Life, Stampin’ Up! will donate $3.00AUD/$$3.50NZ to RMHC.

To date Stampin’ Up! have contributed over $1,000,000 to RMHC and thier network of local RMHC chapters, you can learn more about how you can help by visiting www.stampinup.com/giving_au or www.stampinup.com/giving_nz.

I must admit in previous years I have usually overlooked this stamp set, and not purchased it.  However, this year at convention we were shown some fantastic ways to use this stamp set and saw some gorgeous card samples.  As a result I purchased the Sprinkles of Life stamp set #139971 $37.00.

Sprinkles of Life Photopolymer Stamp Set  by Stampin' Up!

With this stamp set you can sprinkle positive thoughts wherever you want. This set is chock-full of positivity that you’ll want to share with everyone.

Our top-quality photopolymer stamps have just enough give to create a perfectly stamped image every time. They’re entirely transparent for perfect image placement, and they adhere well to our clear blocks. You’ll only need one set of blocks for all your photopolymer stamps (blocks sold separately). The stamps come packaged in cases with images on the spine for easy storage and quick reference.

Quantity: 22 photopolymer stamps

Suggested clear blocks (sold separately): a, c, g

Well with a stamp set this cute I just had to use it for my grand-baby’s 7th birthday this month.  Our darling little Holly is growing so quickly and unfortunately we see her so infrequently what with us living at the other end of the country.  However, she knows that Poppy and Nanny Tina are always thinking of her and we always send her something lovely for her birthday.  This year’s presents were a collection of reading books to help her advance her reading skills at school.  Of course with a nanny who likes to make hand-made cards she always receives a special card just for her.

This is a card I found on Pinterest and just loved the simplicity of it so I had to CASE (copy and share everything) it.

Holly's bday card

Cute hey?  I used A4 Whisper White card stock #106549 as the base and the top mat, and added a mat of A4 Melon Mango card stock #119980 in between which was embossed with the now retired Argyle Embossing Folder.  The ice-cream cones are stamped on Whisper White card stock with retired Baked Brown Sugar ink and then fussy cut out.  The ice-cream is stamped in Daffodil Delight ink #126944 and punched out with the new Tree Builder Punch #138295.  The sprinkles on top are stamped with Melon Mambo ink and the “cherry” on top are Melon Mambo Candy Dots #130931.  The greeting, also from the stamp set Sprinkles of Life is stamped in Melon Mambo ink #126948 and finally I wrapped a piece of Baked Brown Sugar Thick Bakers Twine which is now also retired around the top mat.

I have added links directly to my Stampin’ Up! shop for all the current products mentioned in this post to make it just that little bit easier for you to purchase your own.

I would love to hear your comments and always get such joy from reading them so please leave me your thoughts just by clicking on the little red love heart in the top right hand corner of this post.

Happy stamping!!

Tina xoxo

Posted in Big Shot, Birthday cards, CASEing, Dry Embossing, DSP, Embossing, Embossing Folders, Framelits, Masculine cards, Motorcycle, Patriots Motorcycle Club Cards

Robbo’s Birthday Card


Hi Friends

Yes I am still trying to show you all the cards I have made in the past few months.  I am finally starting to get to the end of the backlog… 🙂

Today’s card is one I made back in May for a friend of ours.  If you follow my blog you would know that my husband is the secretary for a very legal, very community minded, militiary motorbike club, called The Patriots MC.

Robbo is the only life-member we have in out chapter up here in Cairns and it was recently his birthday.  As it turned out his birthday fell on a weekend that we were all away on a ride.  So after we had all set up camp and settled in to our motel rooms at Innot Hot Springs I managed to get everyone from the club to sign the card so our president Coops could present it to Robbo.

Obviously as we are a motorbike club the theme of the card wasn’t a real brain bender.  I bought this now retired motorbike stamp several years ago and it really has been worth the money.

I found a card similiar to this on my friend Vicki Burdick’s website, and used her card as my inspiration.

Robbo's bday card

I used Island Indigo card stock for the card base and added a mat of Basic Black card stock and another mat of retired DSP.  The three banners in Basic Black are die cut using SU Banners Framelits and then embossed with a retired embossing folder.  The large Island Indigo scalloped circle was die cut using our Circle Framelits as was the Whisper White circle.

The motorbike is stamped with Black StazOn ink as is the greeting.  I used dimensionals to pop up the large scalloped circle too.

This is a really simple card but I am loving all the layers.

Remember you can always leave me a comment about my posts just by clicking on the little red love heart in the top right hand corner of each post.  I love reading your comments and hearing you thoughts.

If you would like to make a similiar card you can, just by popping on over to my Stampin’ Up! shop and purchasing some supplies.  I know some of these products are retired but you can always purchase a different embossing folder and DSP to make your own individual project.  That’s the beauty of papercrafting if you see something you love and want to CASE (copy and share everything) it, if the original card was made from now retired products you can always just use one of the current items instead and mix it up a bit.

Don’t you just love papercrafting?  I know I do.

Stay tuned for more projects coming soon.

Thanks for visiting.

Tina xo